What Could My Next Image Look Like?⚓︎
Freetz image including AVM Firewall CGI, Samba, and VSFTP.
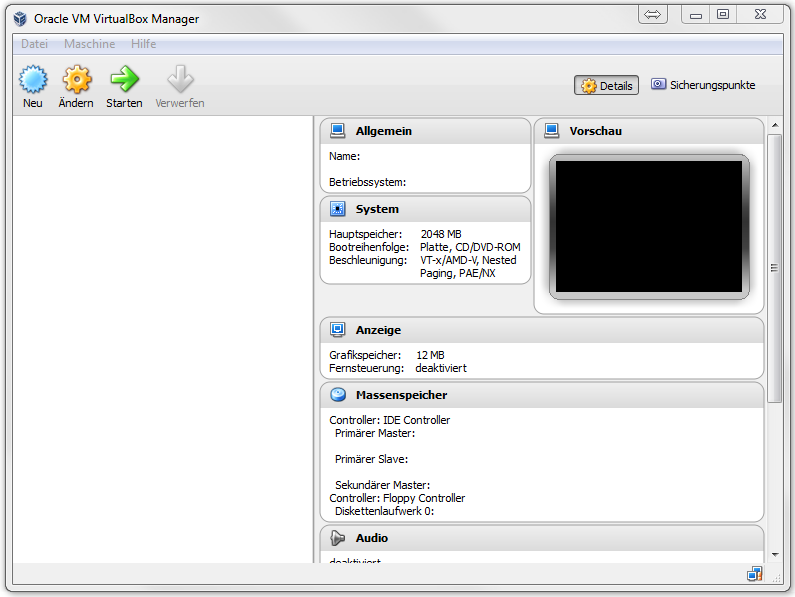
Starting VirtualBox⚓︎
How do I start VirtualBox?. This
step can be skipped if VirtualBox and PuTTY are still running.
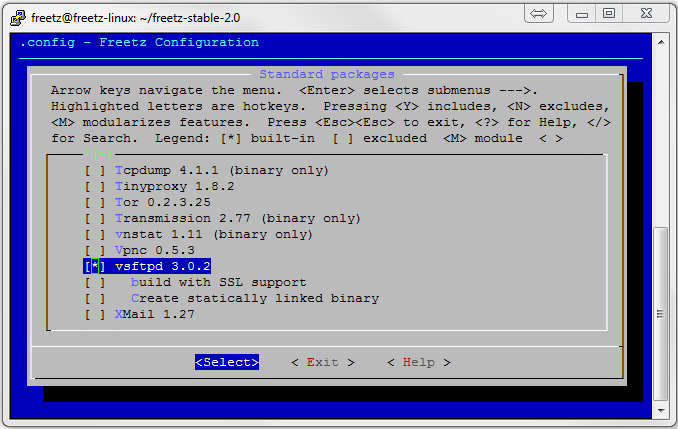
Setting menuconfig⚓︎
To create a new image, we have to call menuconfig again.
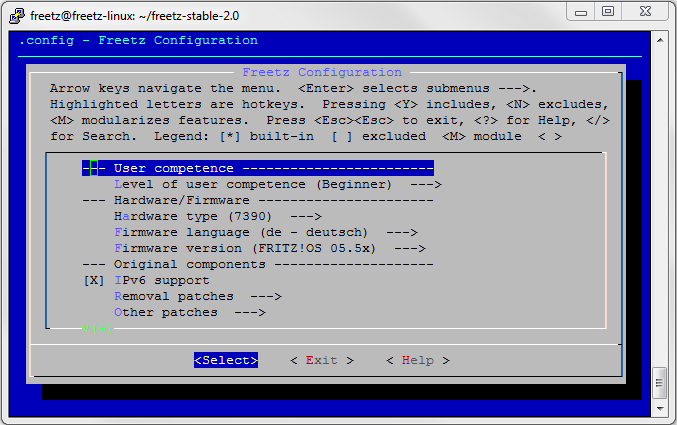
In this interface, select the router to patch and the desired packages.
For this how-to, we chose the 7270_v3 as an example.

At the end, this image should contain the following elements, so we now
select these items:
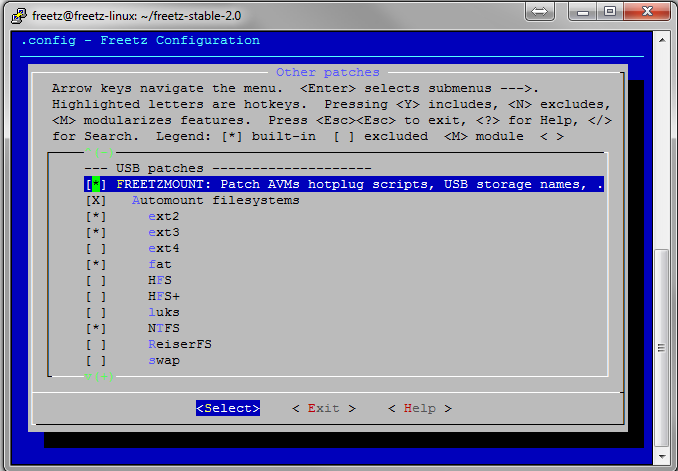
a. Under other patches:
- FREETZMOUNT : Patch AVMs hotplug script, .....
- Leave Automount filesystem selected.
- ext2 (Linux filesystem)
- ext3 (Linux filesystem)
- fat (Windows filesystem)
- NTFS (must be active if you want to use NTFS-formatted disks on
the box)
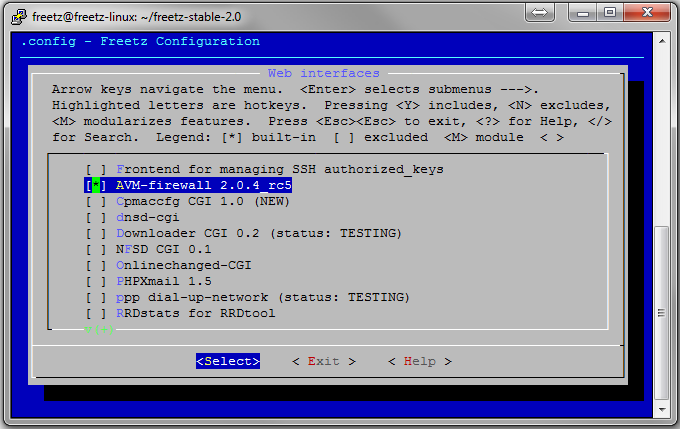
b. Under Packages ---> Web interface --->
- AVM-Firewall 2.0.4_rc5 (web interface for administering the
integrated firewall AVM withholds from the user) - spindown-cgi 0.2 (web interface for sg3_utils, sleep mode for
connected hard disks) - Syslogd CGI (log file for evaluating the system, for example
during troubleshooting)
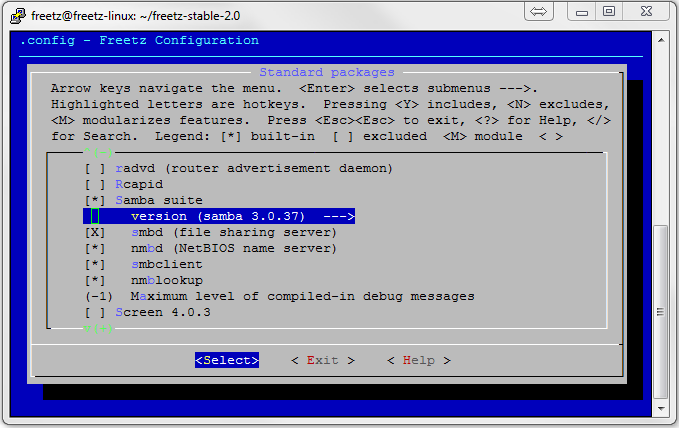
c. Under Packages ---> Standard packages --->
- Samba suite ---> version (samba 3.0.37) (this is the server
that allows Windows access to USB media on the FB).- The following checkmarks must also be set in these subitems:
- smbd (file sharing server)
- nmbd (NetBIOS name server)
- smbclient
- nmblookup
- The following checkmarks must also be set in these subitems:
- vsftp 3.0.2 (FTP server). Please do not set any further
checkmarks in the subitems.
Additional packages and patches including descriptions can be found on
the website: wiki:packages.
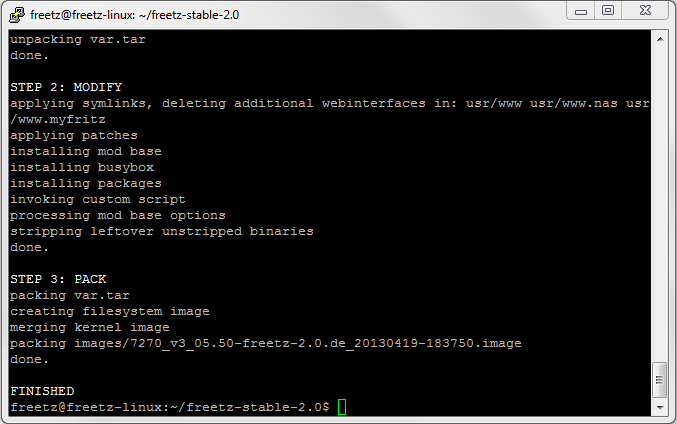
After all packages and patches are selected, exit Freetz and enter
make on the shell console command line. The rest of the build process
then runs as usual. The final message looks like this:
Now we have to copy the image to the PC.
Copy the Image to the PC⚓︎
Information can be found HERE.
Shut Down Freetz Linux⚓︎
You can cleanly shut down your Ubuntu Linux with the command
sudo shutdown -h now. This input must be confirmed again with
freetz.
Flashing⚓︎
Information about the flashing procedure can be found HERE.
Configuring the New Plugins⚓︎
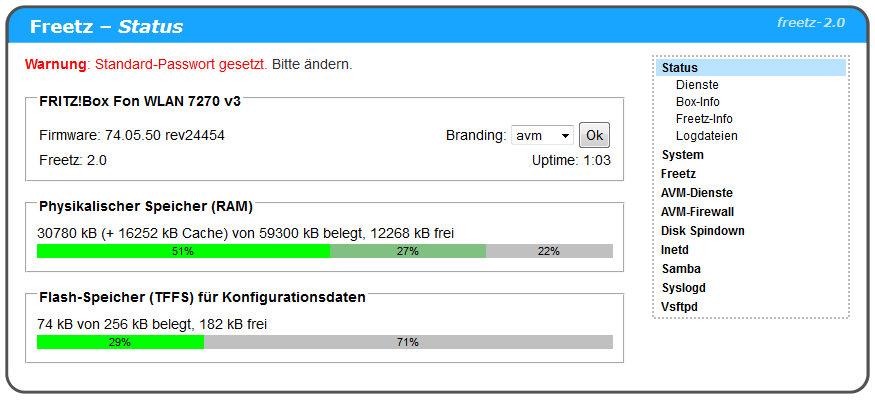
After your FB has started again without problems, you can log in as usual
with a browser at http://fritz.box. In addition,
there is now the Freetz interface, reachable via
http://fritz.box:81. Log in there with
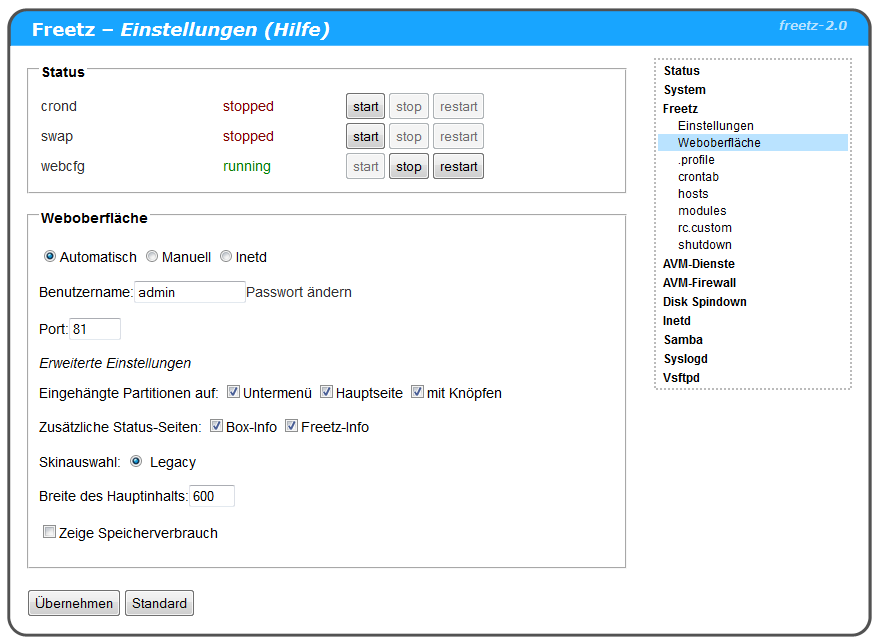
admin and freetz. Afterwards, you see the following screen:
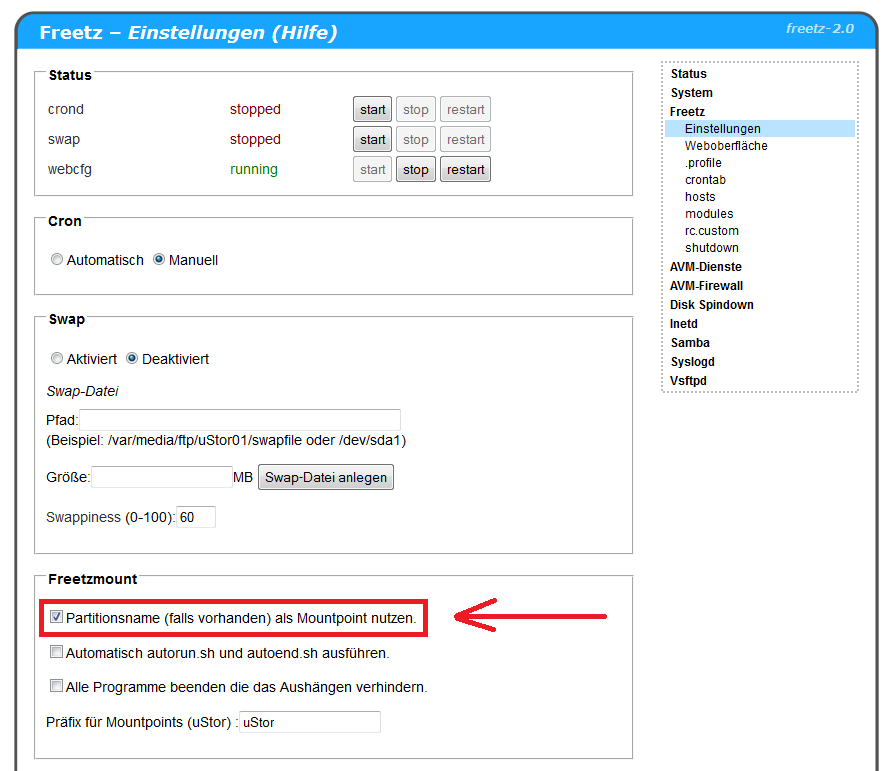
Configure Freetz WebIF⚓︎
- Go to ⇒ Freetz ⇒ Settings and under Freetzmount check
Use partition name (if available) as mount point.
-
Go to ⇒ Freetz ⇒ Web interface and check whether the
following checkmarks are set: -
Submenu
- Main page
- With buttons
- Box info
- Freetz info
Create the USB Stick⚓︎
Now format our USB stick or USB hard disk on the PC as NTFS, name it
USB, and create the following folders on it:
- admin
- gast (subfolder of admin)
- musik (subfolder of admin)
- bilder (subfolder of admin)
- filme (subfolder of admin)
- dokumente (subfolder of admin)
Plug the stick created this way into the USB port of the Fritzbox and
restart it (reboot). After the reboot, you should see the following
Freetz menu:
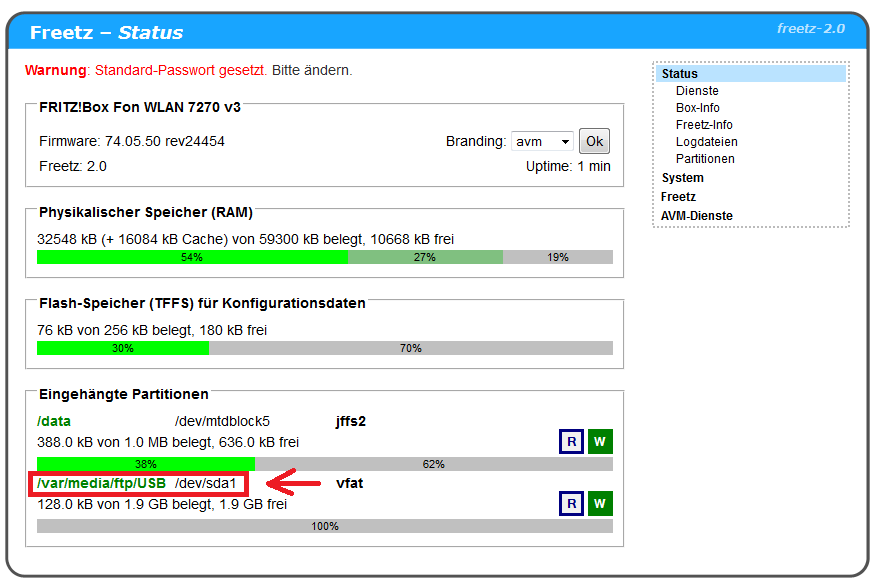
At the bottom you can now see that the USB stick was mounted as USB
(/var/media/ftp/USB). If uStor01 appears there, check the last
steps again.
Set Up a SWAP File⚓︎
- Go to ⇒ Freetz ⇒ Settings.
- Under Swap, activate the item Enabled.
- Under path, enter: /var/media/ftp/USB/swapfile.
- Under size, enter: 20.
- Now press the Create swap file button.
- In the next window, you should see how the SWAP file is created.
    Creating empty file ...
    20+0 records in
    20+0 records out
    Preparing file for swap use ...
    Setting up swapspace version 1, size = 20967424 bytes
You can then simply close this window. If everything is set correctly,
you can start SWAP with the Start button. The display stopped should
change to running.
Samba⚓︎
Settings⚓︎
Startup Type⚓︎
Set everything to Automatic.
Configuration⚓︎
- Samba security = Share
- Username: ftpuser
- Password: * * * * * * (simply leave empty; the dots are still
shown) - IP address: 192.168.178.1(255.255.255.0
- NetBIOS name: NAS
- Workgroup: WORKGROUP
- Description: %h (Samba %v) ⇒ (I would delete this content)
- OS level for election: 20
- Check preferred master
Default Shares⚓︎
Set or leave both checkmarks.

Advanced⚓︎
Copy the following text into the empty field:
    log level = 1
    socket options = TCP_NODELAY IPTOS_LOWDELAY
    read raw = yes
    write raw = yes
    oplocks = yes
    max xmit = 65535
    dead time = 15
    getwd cache = yes
    lpq cache = 30
    unix charset = UTF-8
Shares⚓︎
Copy the following text into the empty field:
    /var/media/ftp/USB USB-Stick 1 0 - USB-Stick
    /var/media/ftp/USB/data/gast Gast 1 0 - Gast
    /var/media/ftp/USB/data/musik Musik 1 0 - Musik
    /var/media/ftp/USB/data/filme Filme 1 0 - Filme
    /var/media/ftp/USB/data/bilder Bilder 1 0 - Bilder
    /var/media/ftp/USB/data/dokumente Dokumente 1 0 - Dokumente
We have now created 6 Windows shares for our USB stick.
- USB-Stick (shows the entire content of the stick)
- Gast (shared folder)
- Musik (shared folder)
- Filme (shared folder)
- Bilder (shared folder)
- Dokumente (shared folder)
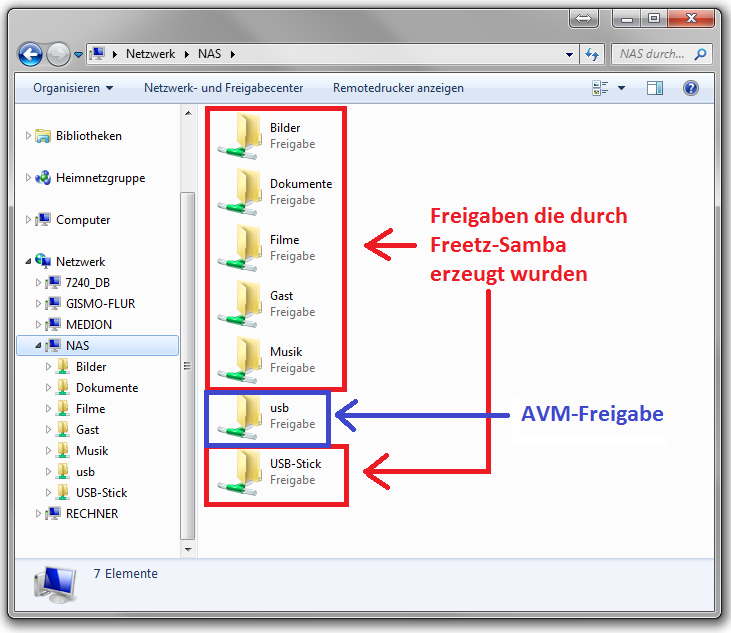
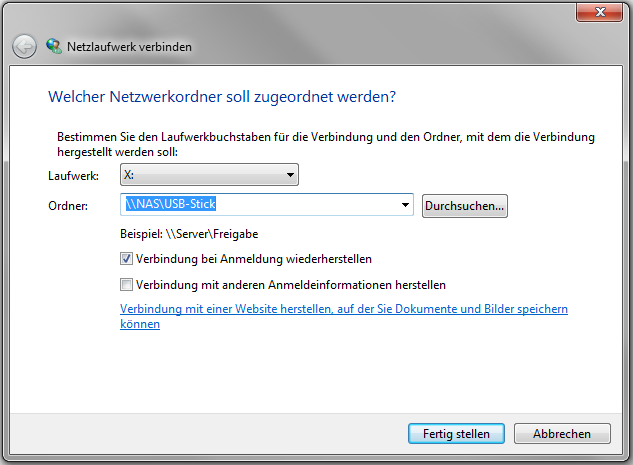
These can now be connected to the PC using Map network drive.
Here is a short description of the parameters using the first share as an
example. These entries are only possible if the current security level is
or will be set to 0.
Example:
/var/media/ftp/USB is the internal path to the USB stick.
/USB-Stick is the shared directory.
USB-Stick is the share name displayed in the Windows network
environment.
1 permits guest access, no username and password required.
0 enables read/write access.
- reason for the dash: ????? (must be included, explanation
follows!)
USB-Stick comment.
Because we assigned NAS as the NetBIOS name, Windows access to the
share is now:
VSFTPD⚓︎
Settings⚓︎
Startup Type⚓︎
Set startup type to Automatic.
FTP Server⚓︎
Bind server to port: 2121. This port must be changed from 21 to 2121,
otherwise VSFTPD cannot be started. If you want to use port 21, AVM FTP
(ftpd) must be stopped; for that, inetd must be set to stopped under
Services.
Warning: stopping ftpd affects some AVM services.
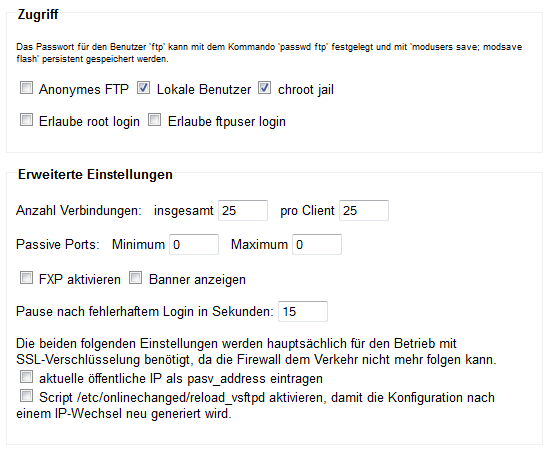
Access⚓︎
The following checkmarks must be set as follows:
- Anonymous FTP = No
- Local users = Yes
- chroot jail = Yes
- Allow root login = No
- Allow ftpuser login = No
Advanced Settings⚓︎
- Number of connections:
- total: 25
- per client: 25
- Passive ports:
- minimum: 0
- maximum: 0
- No other checkmarks are set.
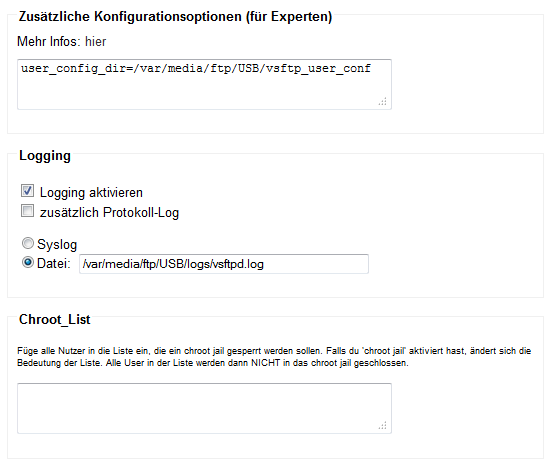
Additional Configuration Options (for Experts)⚓︎
Copy the following text into the empty field:
Logging⚓︎
- Enable logging = checked
- Additional protocol log = empty
- Syslog = disabled
-
File = enabled with the following text:
Changes on the USB Stick⚓︎
The following folders still have to be created directly on the USB stick:
- logs
- vsftp_user_conf
Copy the files from this
ZIP into
these folders as follows:
- logs
- syslog.log
- vsftpd.log
- vsftp_user_conf
- admin
- gast
- mary
- paul
Thanks to Samba already running, the files can now be copied directly
without disconnecting the USB stick from the box.
Permissions for FTP Users (How Do I Correctly Change the Example Files from the ZIP?)⚓︎
Whether a new FTP user should receive write permissions or only be able
to read is controlled as follows: each user receives a file with their
file name in the folder /var/media/ftp/USB/vsftp_user_conf/.
File Content⚓︎
- Mary and admin: write_enable=yes (user has write and delete permissions)
- Gast: write_enable=no (user has no write permissions)
- Paul: these user files can also be used to forbid individual FTP
commands (list)
for users. To do this, add the following line to the file and remove
the commands the user may not execute:
cmds_allowed=ABOR,ACCT,ALLO,APPE,AUTH,CDUP,CWD,DELE,EPRT,EPSV,FEAT,HELP,LIST,MDTM,MKD,MODE,NLST,NOOP,OPTS,PASS,PASV,PBSZ,PORT,PROT,PWD,QUIT,REIN,REST,RETR,RMD,RNFR,RNTO,SITE,SMNT,STAT,STOR,STOU,STRU,SYST,TYPE,USER
Paul can therefore copy files to FTP and create directories, but cannot
delete them again. So the following must be in the file:
cmds_allowed=ABOR,ACCT,ALLO,APPE,AUTH,CDUP,CWD,EPRT,EPSV,FEAT,HELP,LIST,MDTM,MKD,MODE,NLST,NOOP,OPTS,PASS,PASV,PBSZ,PORT,PROT,PWD,QUIT,REIN,REST,RETR,RNFR,RNTO,SITE,SMNT,STAT,STOR,STOU,STRU,SYST,TYPE,USER
DELE (Delete file), RMD (Remove a directory) were removed from
the string shown above.If something still does not work, simply restart the router once more
(reboot the FritzBox).
Create FTP Users⚓︎
- Start the Telnet service under Freetz ⇒ Services.
- Start PuTTY and connect to the box via
telnet (not via SSH).
PuTTY is configured as follows:
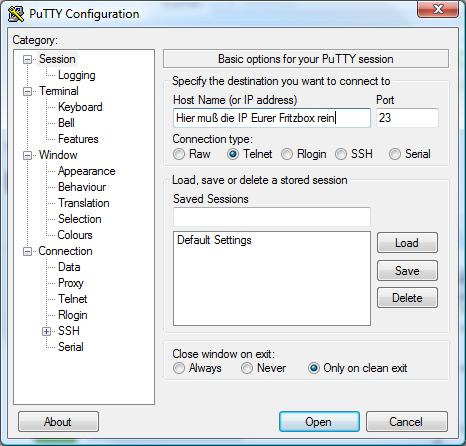
After pressing Open and entering [ login: root ] and
[ Password: freetz ], you should see the following image:
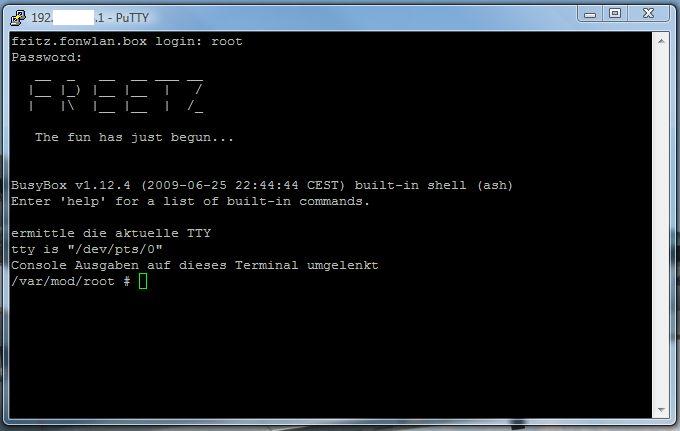
- After logging in, we can now start creating FTP users.
What Is the adduser Command?⚓︎
adduser -h '''Directory''' '''Username'''Directory: folder on the stick assigned to the user, for example
/var/media/ftp/USB/
Username: name of the user
When creating the user, the password is requested immediately afterwards.
It must be entered twice, and nothing is displayed on the screen, not
even stars.
Create FTP Users for Our Image⚓︎
We now want to create the following users:
- admin
- paul
- mary
- gast
For this, enter the following commands in PuTTY. Please pay attention to
uppercase and lowercase spelling.
admin⚓︎
paul⚓︎
mary⚓︎
gast⚓︎
For example, the message for admin in the PuTTY window should look like
this:
    /var/mod/root # adduser -h /var/media/ftp/USB admin
    adduser: /var/media/ftp/USB: Operation not permitted
    Changing password for admin
    New password:
    Bad password: too short
    Retype password:
    Password for admin changed by root
The message Operation not permitted appears if it is a filesystem with
FAT or NTFS.
If you want to change the password again because of an incorrect entry,
use the command passwdUsername. You will then be asked for the
new password twice again. A user can be deleted with the command
deluserUsername. In any case, changes must be saved again with
the command modsave all. The file can be displayed with
cat /var/tmp/passwd. Now log out of the PuTTY console with:
AVM Firewall⚓︎
Settings Page⚓︎
- Change page via the Forwarding item.
- Enable the FTP port; see the images.
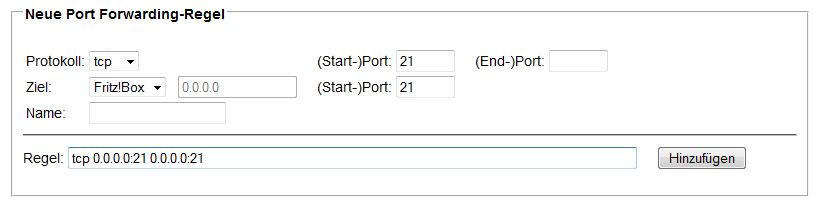
After entering the numbers (see above), simply press Add and the
result should look as follows:
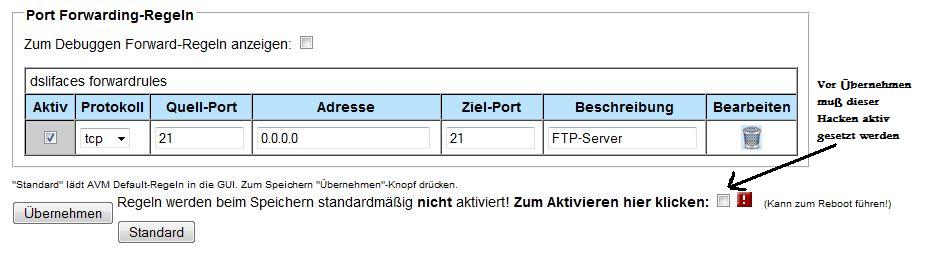
To finally save this setting, simply set the checkmark (flashing box) and
wait for the box to reboot.
Other Questions⚓︎
How Must I Configure My PC So I Can Build an Image?⚓︎
Linux⚓︎
For Linux questions, please look here.
Windows⚓︎
For installation, you need a virtual PC, for example VirtualBox, and a
Linux system such as Freetz Linux:
- Download VirtualBox Player and install it using setup.exe.
- Download Freetz Linux and then copy it to C:\Freetz-Linux.
- Start VirtualBox.
- Import the VirtualBox image (freetz-linux-1.3.1.ova) via File ⇒
Appliance for import ⇒ freetz-linux-1.3.1.ova. Simply click through until
the file is imported.
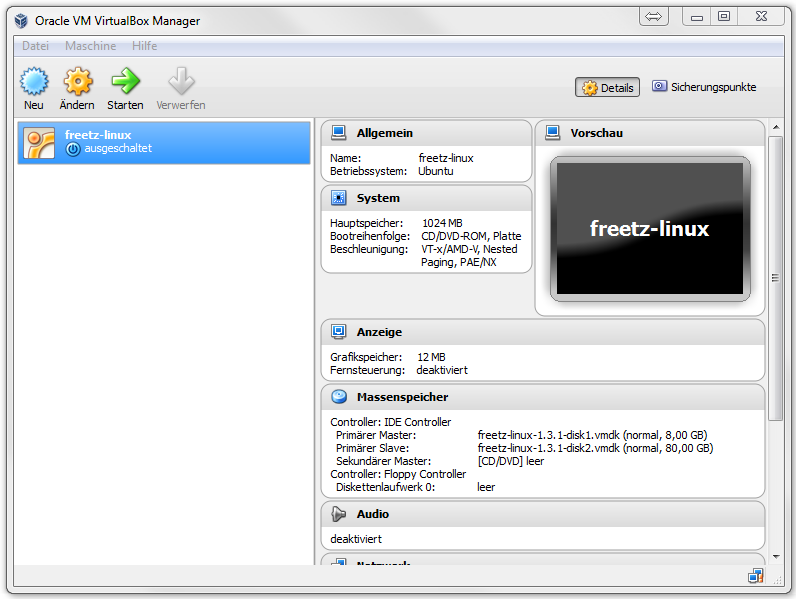
- Start the VM by double-clicking freetz-linux.
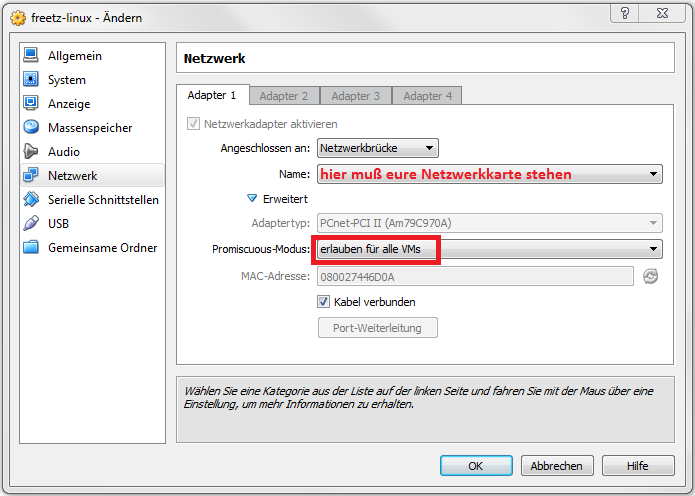
- If you get the following error during startup:
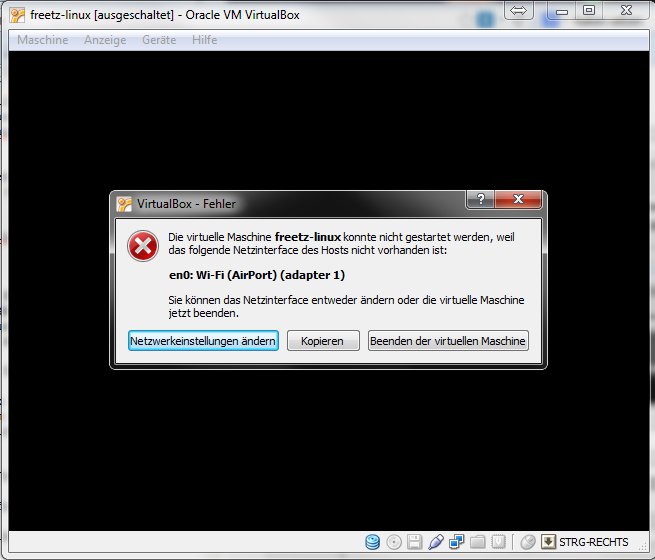
you still have to configure VirtualBox for your network card:
Copy the Image to the PC⚓︎
There are several ways to copy the finished image to the PC:
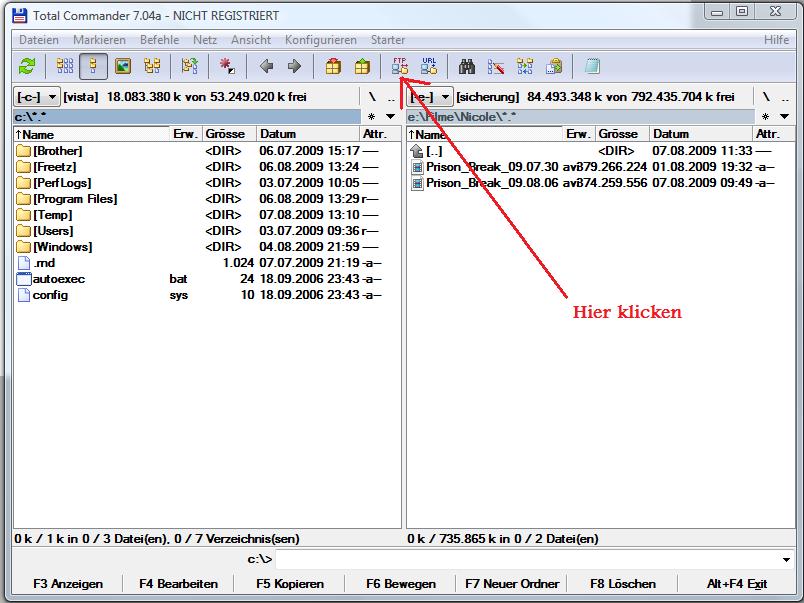
a. Via FTP and Total Commander:
You can find the current Total Commander on the
Total Commander homepage.
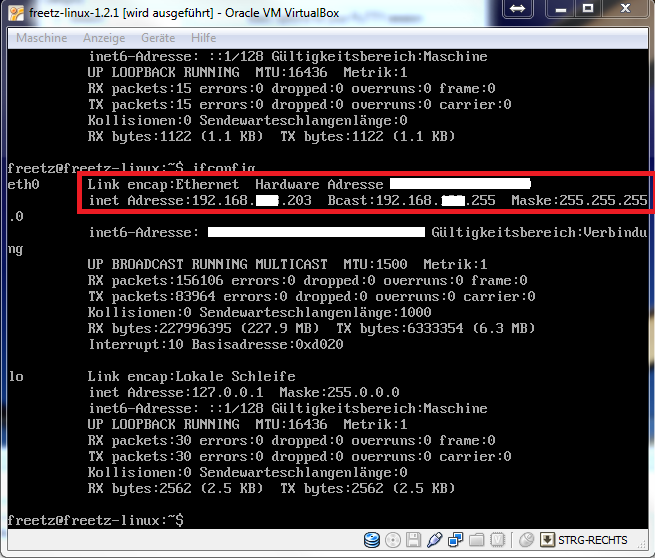
Next we have to determine the IP address of Freetz Linux. We do that with
the command ifconfig in the Freetz Linux environment:
Next, install Total Commander on the PC and start it. The freeware
message has to be confirmed by pressing the corresponding number, here in
the example 1. Pressing it creates no further costs.

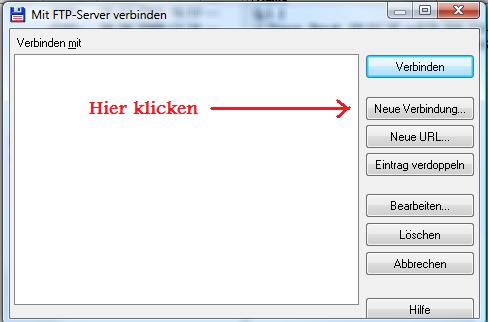
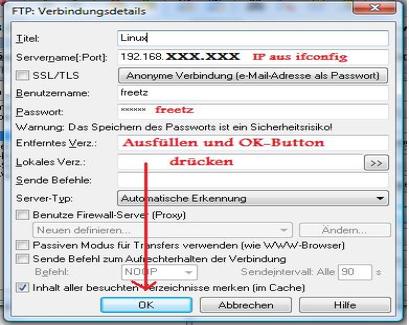
Now set up the FTP connection in TC (Total Commander):

b. Via SFTP and WinSCP:
Here is the SFTP path. Get an SFTP client, for example
WinSCP. You need the IP address of your virtual
Freetz Linux, which you can find with:
After starting WinSCP, enter the required data in the login window:
    Host name: IP address just determined
    Port number: 22
    Username: freetz
    Password: freetz
    Protocol: SFTP
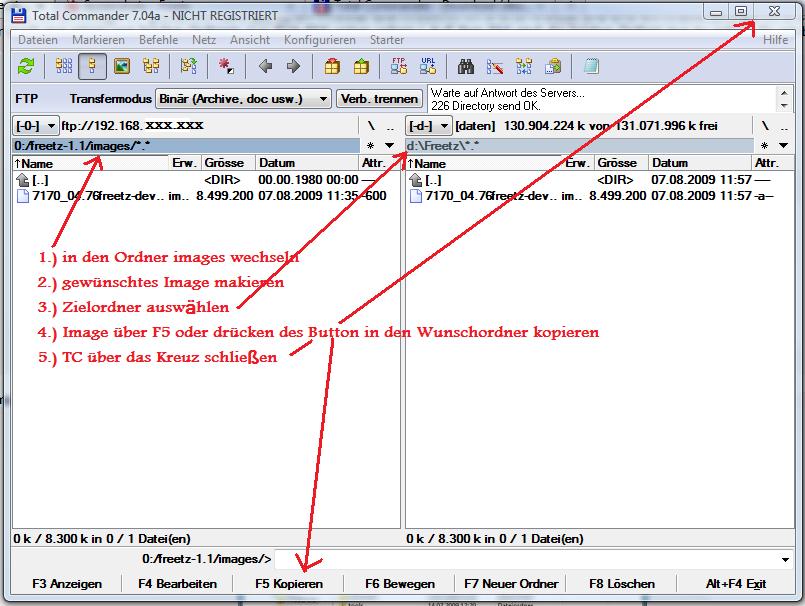
After connecting successfully, navigate in the NC-like view to the
corresponding /images directory and copy the firmware with
F5 Copy.
c. Using a mapped network drive:
Freetz Linux has Samba configured by default, which allows you to map the
Freetz Linux drive as a network drive in Windows.
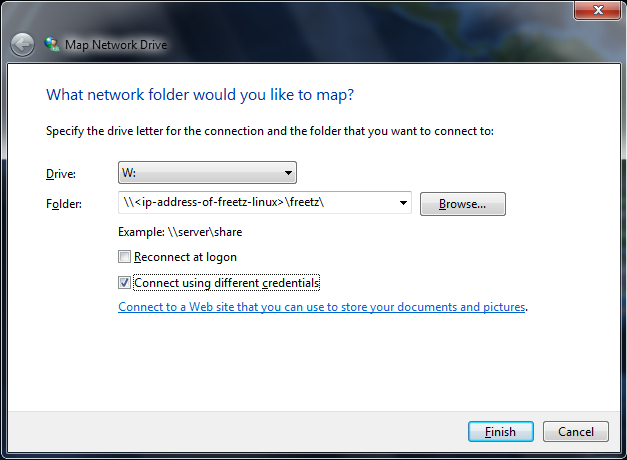
Use freetz/freetz as username and password.
How Can I Update a Freetzed Fritzbox?⚓︎
A precise description and everything you need to know about this topic is
in the FAQs.
Some Programs Have Similar Functions; Which Are More Performant?⚓︎
FTP: bftpd is not recommended if high data throughput matters, because
it achieves only about half of the possible performance. Vsftpd is used
by many people and is therefore recommended.
WWW: Anyone hosting web pages on the box should stay away from Apache if
moving toward a production system. Lighttpd is a good alternative.
Web filter: people often ask whether Privoxy can be used for page
filtering. The answer is yes, but the previous recommendation was to
avoid it and use Iptables instead, because otherwise the entire internet
runs slower.
Linux Commands (Target Group: Newbies)⚓︎
General Linux Commands⚓︎
You can find a basic set of Linux commands here:
The vi Editor⚓︎
vi is a text editor in the Freetz/Linux environment. Files and
scripts can be edited with it. Newbies should use this option only when
instructed or together with an experienced Freetz user/Linux
professional, because it is very easy to make the box no longer
reachable with vi. For configuration files in the FritzBox flash, the
script nvi must be used because these files cannot be edited directly
with vi. With nvi, it is even faster to cripple the box. nvi
also overwrites even if nothing was changed.